CONTENTS
Graphs: sine, cosine and tangent
OTHER MATERIAL
Circular Functions
As we mentioned in the previous section, there's a close relationship between the trigonometric functions and circles—so close that some older textbooks call these functions 'circular functions'. One reason for this relationship is that the set of all right triangles with the same hypotenuse forms a circle, with the hypotenuse defining its radius.
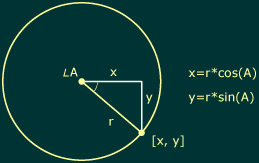
As you can see, the perpendicular sides of the right triangles correspond to the X- and Y-coordinates of points on the circle, relative to the circle's center. We therefore can use the trigonometric functions to find the coordinates of points on a circle, in the same way we found the length of an unknown side of a right triangle, above:

For any point on a circle with radius r, the X-coordinate is given by r*cos(A) and the Y-coordinate is given by r*sin(A) — where A is the angle in radians from the horizontal. In the following project, we'll use this to make a layer orbit around a central point.
Example: Circular Motion
![]() It
may seem like no big deal to make a layer orbit in a perfect circle. After
all, we could do this easily just by offsetting the layer's anchor point,
and then animating its rotation parameter. The difference is that animating
rotation would of course make the layer appear to rotate, whereas applying
our expression to its position parameter will not—its orientation
relative to the comp frame will remain unchanged. In fact, we'll still
be free to rotate the layer any way we'd like, independent of its orbit.
It
may seem like no big deal to make a layer orbit in a perfect circle. After
all, we could do this easily just by offsetting the layer's anchor point,
and then animating its rotation parameter. The difference is that animating
rotation would of course make the layer appear to rotate, whereas applying
our expression to its position parameter will not—its orientation
relative to the comp frame will remain unchanged. In fact, we'll still
be free to rotate the layer any way we'd like, independent of its orbit.
First, we'll define a variable for the center point of our orbit:
center=this_comp.layer("Center").position;
Next, we'll define the radius, in pixels:
radius= 120;
Now we need to decide what source we'll use for 'angle'. This variable will drive the layer's animation, because changes in angle A move the layer around its orbit. In this project, we'll use time as the incoming parameter for angle A, so that the layer will animate 'automatically' as comp time elapses. To make the layer orbit faster, we'll actually use time*2—so our layer will now take Pi seconds to complete its orbit (remember that the trigonometric functions expect radians, and there are 2Pi radians in a circle):
angle=time*2;
We can now write the core of the expression:
x=radius*Math.cos(angle);
y=radius*Math.cos(angle);
Finally, we just need to add these x and y offsets to the center's coordinates to get our layer's new position, in comp coordinates:
add(center, [x,y]);
The final animation:
Click here to download this project file. (Windows users click here.)
Example: Circular Placement
![]() Many
other programs offer step-and-repeat functions that let you quickly place
a series of objects in precise alignment. After Effects does not provide
such a tool, but we can create expressions that work similarly. Here,
we'll modify the above expression to place a series of layers in a precise
circle.
Many
other programs offer step-and-repeat functions that let you quickly place
a series of objects in precise alignment. After Effects does not provide
such a tool, but we can create expressions that work similarly. Here,
we'll modify the above expression to place a series of layers in a precise
circle.
In the above expression, we based the variable 'angle' on time—causing the layer to move in a circle as time elapsed. In this expression, we'll base 'angle' on the layer index (its number in the Timeline window). As the layer index increases, so will 'angle', causing the layer to change position. So when we duplicate our layer the copies will be perfectly placed around the circle:
layer_num=index-1;
interval=30;
angle=degrees_to_radians(layer_num*interval);
We subtract 1 from 'index' so that layer_num will start counting at zero. This way, our first layer will be at an angle of zero degrees, relative to the horizontal. This is just a preference of mine, and not essential to the expression in any way.
'Interval' determines how far apart the copies will be spaced. By multiplying layer_num by interval, we transform a series of layer numbers {0, 1, 2...} to a series of angles {0, 30, 60...}. We then use degrees_to_radians() to convert these values to radians, the unit expected by Javascript's trigonometric functions.
The net effect is that layer #1 in the comp will be placed at zero degrees around the circle. The second will be placed at 30 degrees; the third at 90 degrees, and so on. The animation below simulates what you'd see when duplicating the initial layer with this expression attached:
After you'd created as many copies as needed, in perfect alignment, you could use the 'Convert Expression to Keyframes' Keyframe Assistant (in the Animation menu) to replace the expression with keyframes. You can then delete these keyframes to be free to animate the layers without that annoying 'disable expression?' dialog box.
Admittedly, this is a lot of work for simple step-and-repeat operations—but it can be a terrific technique for complicated or time-consuming setups.
Here is the complete expression, attached to the position parameter:
center=this_comp.layer("Center").position;
radius=80;
interval=30;
layer_num=index-1;
angle=degrees_to_radians(layer_num*interval);
x=radius*Math.cos(angle);
y=radius*Math.sin(angle);
add(center, [x, y]);
Click here to download this project. (Windows users click here.)